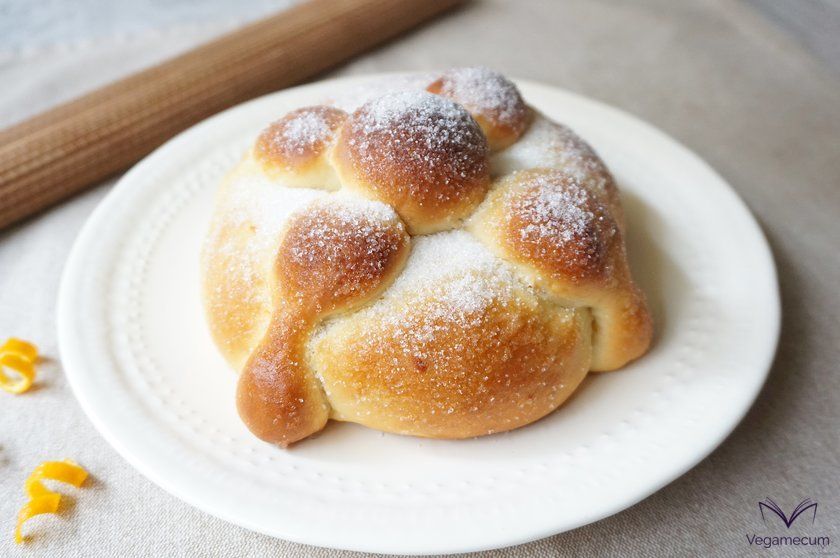
Egg-free and dairy-free pan de muerto
*Plus 2 and a half hours of resting time
Pan de muerto is a sweet bread typical of Mexico that is eaten on the "Day of the Dead" to honor the memory of loved ones who are no longer with us. This day was declared by UNESCO a "Masterpiece of the Oral and Intangible Heritage of Humanity" on November 7, 2003.
Although the origin of this sweet bread dates back to the 16th century, according to the INAH (National Institute of Anthropology and History) its consumption appears to be a tradition inspired by pre-Hispanic rituals, today symbolizing the circle that unites life and death, hence its round shape.
This sweet bread is full of symbolism, because besides its shape, the other elements that make it up also have a reason for being. Thus, the sphere in the center represents a skull, while the "canillas" (bone-shaped strips) represent the bones, crossed so that they refer to the 4 cardinal points dedicated to the gods Tezcatlipoca, lord of heaven and earth; Tlaloc, supreme god of rain; Quetzalcoatl, lord of the morning star; and Xipetotec, god of spring. If we look at the ends of the canillas, we see that they look like tears, which symbolize the tears shed for the absence of those who have passed away.
And indeed, in this sweet bread even the color and flavor are deliberate, since yellow is the color that was associated with death in pre-Columbian times, and orange blossom is used in honor of those who are no longer here, because its flavor lingers like the memory of those who departed.
This delicacy is characterized by a tender, soft and fluffy texture, and a flavor in which the sweet notes of orange combine with the fragrant aroma of orange blossom, qualities that make it a delicious offering to welcome the most beloved souls on November 1 and 2.
In addition, since it contains no eggs or dairy, this pan de muerto is healthier and lighter than the conventional one, as it contains no cholesterol, lactose, casein or trans fats.
Categories
Measurement system
Tap on the ingredients to add or remove them from the shopping list
Notes
Tap on the steps to mark them as done
- Step 1In a bowl, combine 50 ml. soy milk (lukewarm) with the yeast and stir until it dissolves. Add 30 gr. wheat flour and 30 gr. whole cane sugar and stir again. Cover the bowl with a clean cloth and leave it in a warm place to rise.
- Step 2Wash the oranges well, grate the zest and set aside as well.
- Step 3In another bowl, put the cornstarch and the water and stir until the starch dissolves. Set aside.
- Step 4On a flat, clean surface, place the remaining flour, make a well in the middle and, around the flour, on the outer edge, add the sugar. Finally, around the sugar, add the salt.
- Step 5Pour the starch and water mixture into the well in the center of the flour and gradually mix it with the flour. Then add the margarine and continue kneading, also incorporating the sugar and salt, from the outside toward the center.
- Step 6Once the ingredients are well combined, add the orange zest and the orange blossom water and mix again.
- Step 7Add the soy milk little by little and knead for 15 minutes, resting for 2 minutes for every 5 minutes of kneading so the dough gains consistency.
- Step 8After this time, when the dough no longer sticks to your hands or the work surface, make a well in the center, add the mixture of soy milk, yeast, flour and sugar that we set aside, and knead again for 30 more minutes, this time without stopping, until the dough once again does not stick to your hands or the work surface.
- Step 9Once the dough is ready, shape it into a ball, transfer it to a large bowl with the sides greased with a little oil to prevent sticking, cover it with a clean cloth and place it in the switched-off oven for 1 and a half hours, until it doubles in volume.
- Step 10After this time, remove the dough and place it back on a lightly floured, smooth surface. Gently press it down to release any air bubbles and shape it into a rectangle. Set aside approximately one-fifth of the dough to make the canillas and skulls, and divide the remainder into as many equal portions as loaves you wish to prepare.
- Step 11We sprinkle some flour on the work surface. We take one of the portions of dough and shape it into a round by gently stretching it downwards and rotating it to create a smooth surface. Once the surface is smooth, we place the loaf on a baking sheet lined with parchment paper and flatten it slightly with our hand. We repeat these steps to shape the remaining loaves and transfer them to the baking sheet, leaving enough space between them so they don't stick together as they rise.
- Step 12To the piece of dough we had set aside for decoration, we add a little flour and knead it again to achieve a drier texture. We shape it into a rectangle and, with a knife, divide it into as many pieces as decorations we are going to make: one portion for the skull and two for the "shanks" of each loaf.
- Step 13To make the skulls, do the same as with the loaves: shape them into rounds, working downward so the surface is nice and smooth.
- Step 14To make the bone-shaped decorations, roll each piece of dough into a cylinder. Place your index finger in the centre and roll the cylinder back and forth to create a pronounced indentation. Then place both index fingers on either side of that indentation, in the centre of each of the 2 ends, and roll back and forth again until you have a bone shape. Repeat with the remaining pieces of dough until all the bones are ready.
- Step 15Brush with a little water where the bones will go and place them crossed over each of the loaves, making sure they are well attached. Also brush where the skull will go and place it carefully. Once assembled, transfer the loaves to the baking tray and let them rest for 1 more hour in the switched-off oven so they double in volume.
- Step 16After this time, remove the tray from the oven and preheat it to 175 °C. Once the oven has reached this temperature, place the tray on the second rack and bake the loaves for 20 minutes. If, after 10 minutes, the loaves start to brown too much, cover them with parchment paper and continue baking until the end, watching carefully to ensure they don't burn.
- Step 17Once baked and still hot, transfer them to a rack, brush the loaves one by one with a little melted margarine and sprinkle a little sugar on top. Shake off the excess sugar and serve.